
How To Put Any Person Or Object In AI Images
A step-by-step tutorial on creating AI images on your Windows 10 computer, completely free.

Soooo I did an AI thing I’m very proud of this weekend.
I was able to train an AI model on my own computer for free to recognize who I am so I can put myself into all sorts of cool pictures (and eventually video).
This newsletter goes step-by-step so that you can do this with your own face.
The power of this is hard to understate.
With some practice and extra know-how, you can create your own character and build a story around them using only AI imagery.
Imagine you create your own cartoon character based on your face using only AI and use AI to create cartoons. Additionally, you can take pictures (and video) of real people and turn them into cartoon characters (not covered in this tutorial, I’m working on making this happen).
We’re getting dangerously close to creating cartoons without hiring an artist. You just need the technical know-how.
Can you tell which is real and which is AI?

This lil project I’ve been working on is inspired by Corridor Digital’s recent Rock, Paper, Scissors anime, created from real footage and illustrated by AI.
Their process is approximately the following:
Trained an AI to recognize their faces.
Trained an AI to understand the cartoon style of the anime Vampire Hunter D.
Filmed all the shots with real people and real cameras on a green screen.
Took each frame from the real footage and used img2img AI to turn the real footage in the Vampire Hunter D anime style.
Used deflicker in the video editing software Divinchi Resolve to buff out the inconsistencies between each frame illustrated by AI (remember that each image produced by AI is completely unique, therefore it doesn’t remember where hair, shadows, and details are positioned compared to the last frame)
If you don’t want to create an AI using any person or object, I highly recommend you watch some of their videos, as they’ve been on the bleeding edge of VFX, AI, and storytelling for a while.
In this newsletter, I’ll help you train an AI model to recognize any person or object. The installation is covered in a video below, and training the model is covered step by step in the newsletter below.
Let’s talk tutorial. This tutorial is for Windows 10.
Forewarning: the process is quite involved.
You may get frustrated and confused during the process. Follow the installation and AI training instructions below and you’ll be ready. If you can get this working, you’re in the top 1% of humans using AI for images and video.
If you get stuck, try using chatGPT to explain what you’re trying to do and paste the entire error there. It’s been pretty helpful for me.
Additionally, there are a lot of people in this Discord who are willing to help you. I feel strongly about getting to know people on the cutting edge of tech because they are the ones who use it to help shape society.
Install Automatic1111
First, you’ll need to install Automatic1111. Since your computer is processing the images, this web interface creates AI images (img2img, txt2img) without paying for credits.
Here’s the installation tutorial.
It really is a great video. Short, sweet, and to the point.
You’ll need to download/install these three things covered in the video above.
Once you install, you’re ready to train your model using dreambooth.
Dreambooth Your Images
Once you get everything installed, it’s time to use Dreambooth to create a model of your character, object, etc.
The link to Dreambooth is a bit further in the newsletter. I have a few points I think you should know first.
In order to Dreambooth, you’ll need at least six images of the person or thing you want to create in AI.
The images should be square.
These images should be in different lighting settings, angles, outfits, etc.
If you’re training a person, the only thing that should remain consistent is the face.
If you’re training an object, photograph it in multiple places, angles, and lighting scenarios.
I’ve found that the AI will remember EXACT ATTRIBUTES of whatever images you take. I had a few images where some of my head was out of frame, resulting in some images with my face not fully in frame.
If your graphics card has less than 16GB of memory, you’ll have to use a cloud computer to process the model for you. FYI, most graphics cards have less than 16GB.
Here’s how to see your graphics card’s memory capacity.
Open Task Manager (Crtl+Shift+Esc)
Click on the Performance tab in the top left
Click GPU (If you’re on a laptop, click the one labeled GPU 1)
Dedicated Memory is how many Gb of video memory is in your PC

Because my graphics card doesn’t have 16GB of memory, I used Google Colab (a free service by Google) to train my model on their supercomputers.
Colab is made for sharing code and running it on powerful computers owned by Google. Lucky for us, someone has made a Google Colab for creating Dreambooths.
Click here to go to the Dreambooth Google Colab
Google Colab may be confusing at first, but it’s pretty simple.
When signing up/setting up Google Colab, select machine learning as your intended use when setting up Colab.
When using Google Colab, start at the top of the page, and click the play button on one module at a time to run the code.
Below are examples of three modules in the Dreambooth Google Colab.

Don’t run two modules at the same time. Wait for the top module to complete, indicated by a small green check next to the play arrow, before moving on to the next.
Sometimes you’ll have to enter some information before you run the module.
Let’s go step by step in Google Colab.
Check type of GPU and VRAM available
This is the first step. Pretty easy. Just press the play button. This gets the hardware specifications on the Google computer we’re using.

Wait for the green check mark next to the play button, then move onto the next module.
Install Requirements
This is the second step. Also pretty easy. Press play and the required software will install automatically to Google’s computer.

If you don’t see a play button, hover over the two brackets and the play button will appear. Brackets look like [ ] in the top left of the module.
No code or changes to the code are needed. It takes a minute or so to complete, so wait a bit and you’ll eventually see a green check next to the play arrow.
Wait for the green check mark next to the play button, then move onto the next module.
Login to HuggingFace
HuggingFace is a database of tons of AI models. We;ll need to use one of their models to train you model, so you’ll need to link your account in order to do that.
First, login to Hugging Face linked here.
Then come back to this newsletter and click here to go directly to your Hugging Face Token.
Set a key up by pressing New token, name it Dreambooth, then set it to read.

Copy it from Hugging Face, paste it into the HUGGINGFACE_TOKEN section in Google Colab, and press run.

Wait for the green check mark next to the play button, then move onto the next module.
Settings and run
When you get to Settings and run, BE SURE TO CHECK save_to_gdrive.
This will put the file we need into your Google Drive. If you need to connect Google Colab to your Google Drive, do that and ensure you have at least 6GB free in your Google Drive.
Next delete the part circled below (just zwx) and rename it to whatever person/object you’re teaching AI to make.
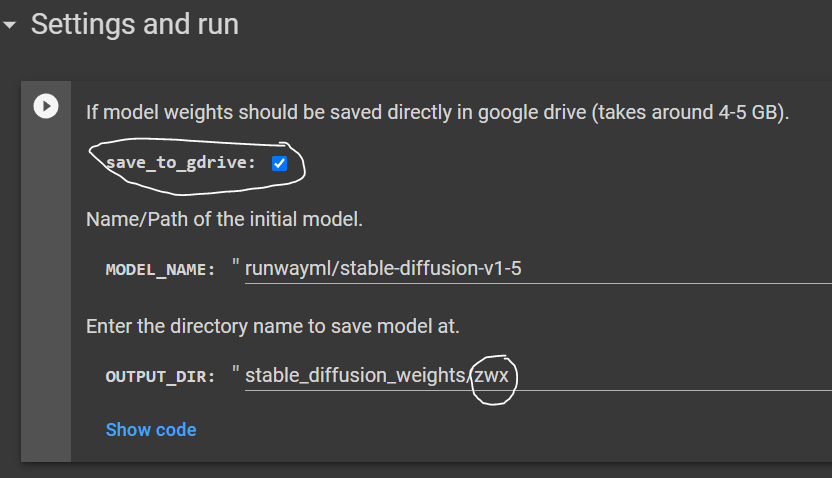
You’ll want to name it something unique that AI wouldn’t have categorized already so it doesn’t overwrite what it already knows. For example, you wouldn’t want to name it a dog because every dog it makes will look like your image and your image only.
Because I trained AI to recognize me, I named myself EzraFuller1.
For example if you were training a car, rename it to mychevycaprice
Once you set the directory, press play, wait for the green check mark next to the play button, and move onto the next module.
Start Training
Scroll down a bit until you see this screen.

In this module, you’ll need to change some code. It’s simpler than it seems.
Instance is the person/object you want to teach AI to make.
Class is a descriptor of the person/object that the AI already knows.
You’ll need to change the text circled above.
Luckily, the green text in the image above exemplifies what to put. Refer to the green text if you get confused. Further information on each line is below.
For instance_prompt, I changed my text to “photo of EzraFuller1 man”. You’ll want to include your unique person/object name, and a description. Because I’m a man, I told AI to categorize my face as a man, so it knows where to put my face in images. My face isn’t meant to be put on a car, house, dog. It’s meant to be on the head of a man. You must tell it how to categorize the person/object you’re teaching it. If you’re teaching it to make a table, instead of man, say table. Makes sense?
If it doesn’t make sense, just make sure the last word is the simplest form of what you’re trying to train: man, car, house, dog. (Side note: without the context of this tutorial, saying, “my face is meant to be on the head of a man” is hilarious).
For class_prompt, I changed my text to “photo of man.” This is so the AI knows how to categorize your teaching. Examples of other classes would be car, house, dog, if that’s what you wanted AI to learn.
For instance_data_dir, I changed mine to “content/data/EzraFuller1”. You’ll only need to change the last word to the same unique name you put in instance_prompt. This is to help the AI know where to store files related to your model.
For class_data_dir, I changed mine to “content/data/man”. You’ll only need to change the last word, which should be the same word you put in class_prompt. This is also to help the AI know where to store files related to your model.
Press play and wait for the green check mark next to the play button, then move onto the next module.
Uploading Images
Still part of the Start Training module, scroll down, and you’ll see this immediately.

The next step is uploading at least six images of the person/object you want to create in AI. It’s important that these images are square. If they’re not square, your AI images will look wonky. Don’t forget about the image tips I put at the beginning of the Dreambooth section!
These images should be in different lighting settings, angles, outfits, etc. If you’re training a person, the only thing that should remain consistent is the face. If you’re training an object, photograph it in multiple places, angles, lighting scenarios.
I’ve found that the AI will remember EXACT ATTRIBUTES of whatever images you take. I had a few images where some of my head was out of frame, resulting in some images with my face not fully in frame.
Press the play button on this module below.
Once you press play, you’ll get an option to upload files from your computer. Select at least 6 images of the same person/object, and they’ll upload automatically.
Wait for the green check mark next to the play button, then move onto the next module.
accelerate launch
We’re almost done!
Still in the Start Training section, you’ll see this section.

The only thing you need to change is the line circled in white.
Remember the part earlier where you told the AI how to categorize the person/object? We’ll paste your intance_prompt here in between the quotes. You’ll replace the orange text with your instance_prompt ie: “photo of EzraFuller1 man”.
Once the training is done, it’ll use this prompt to generate a few sample images.
Press play, wait for the green check mark next to the play button, then move on to the next module.
Finishing Up
All the hard work is done! It’s smooth sailing from here, no more code editing needed.
The next two things are easy. Press play on the first, wait for it to finish, then press play on the next.

Once those two are finished, move onto the next.
In the next module, make sure fp16 is checked.

For context, this module creates a .ckpt file. This .chpt file holds your AI model.
Press play, and wait for the green check.
Final Modules
There are a few easy steps left
These are two separate modules
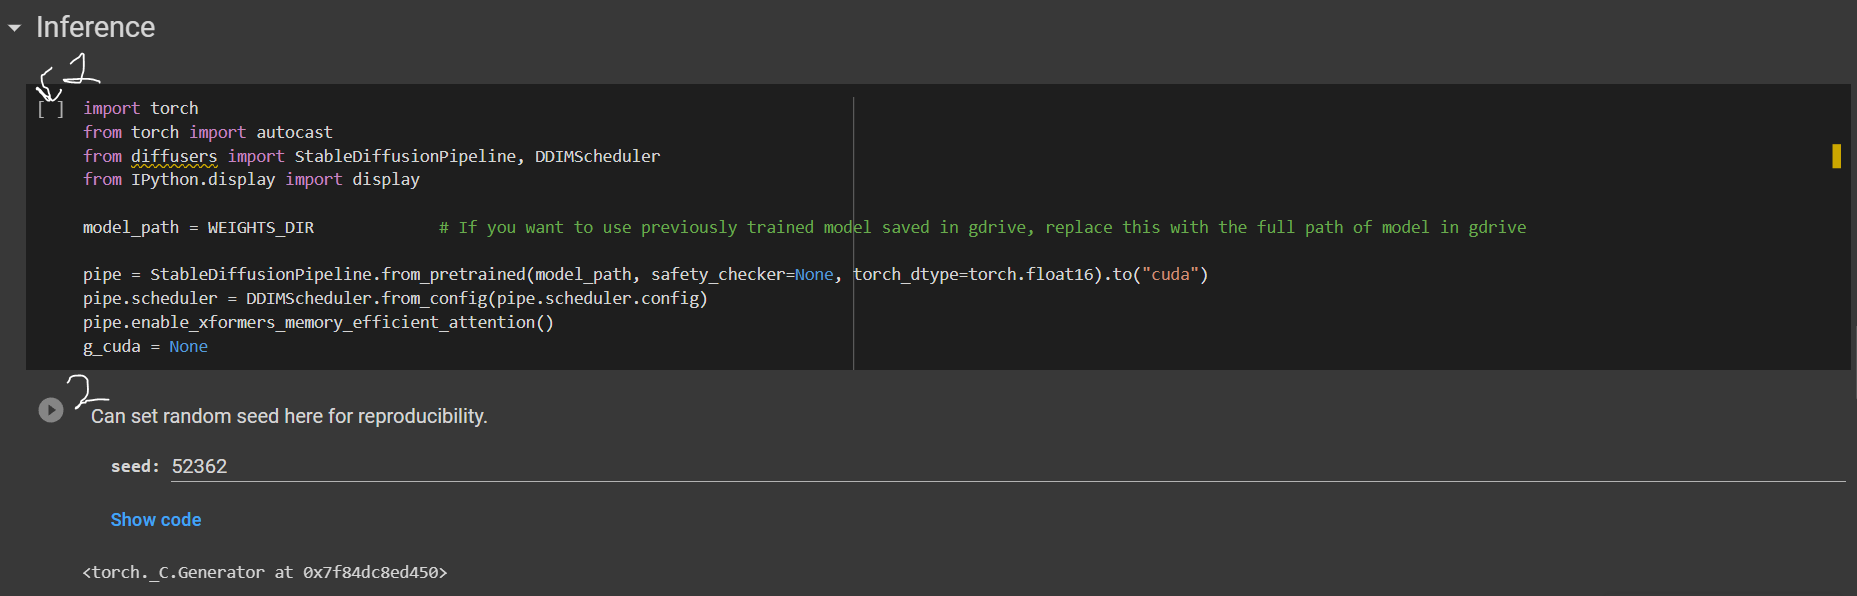
You don’t need to change anything. Just press play on the first one, then wait for it to complete.
You can skip the second module Can set random seed here for reproducibility. Or run it if you want, it doesn't affect anything in the tutorial.
THIS IS THE PART YOU‘VE BEEN WAITING FOR
Time to test :)
Replace the first line with what you want the AI to make with your person or object!
For the first test, I’d run a very simple prompt. It’s good to copy your instance_prompt to see if the model trained to your liking.
If the images aren’t to your liking, you’ll need to use different photos to train your model.
That’s all we need to do in Google Colab! You can always come back to Google Colab and re-do the process with new images & instance prompts to train whatever you want.
Let’s do two last things to get this model on your computer so you can make a bunch of cool things on your own computer for free.
Adding Model To Your Computer
These are the last two things we need to do
Go to your Google Drive and click Recent

Then find model.ckpt and download it to your computer.
Remember, this is your AI model with your person/object in it.
I renamed my model to my instance_prompt ie: EzraFuller1.ckpt
Let’s put your model in the correct folder so you can use it.
Next, go to where your stable-diffusion-webui-master folder is.
You’ll want to go to stable-diffusion-webui-master\models\Stable-diffusion and drag your model.ckpt file you just downloaded from Google Drive and drag it into this folder.

Now, launch your stable diffusion web UI and select the correct model in the dropdown menu in the top left.

That’s it! Now you can make all kinds of cool images with your new model :)
Thank you so much for reading. Getting this model to work was a labor of love. Creating this tutorial was also a labor of love.
If I can get it to work in time, I plan to cover how to use these models to create your own cartoon :)
Subscribe to get next week’s newsletter to your inbox next Monday at 7am.